Showing posts with label Halloween. Show all posts

Wednesday, October 26, 2011

Candy Corn Rice Crispy Treats


Thanks to the blog My Creative Stirrings for this fun idea!  Check out her blog for great pictures and assembly instructions.

6 tablespoons margarine, divided
6 full cups mini marshmallows, divided
7 1/2 cups crispy rice cereal, divided
food coloring
butter or margarine
Measure 2 1/2 cups crispy cereal and place in a large bowl; set aside.  Grease one large and one small piece of waxed paper.  Line a large bread pan with the large piece, greased side up; set aside. 
In a small sauce pan combine 2 tablespoons margarine and 2 full cups of mini marshmallows just until melted.  Stir in cereal from the large bowl until combined.  Press into the bottom of the bread pan; set aside.  Wash the small sauce pan. 
Measure 2 1/2 cups cereal and place in a large bowl; set aside.  In the small saucepan combine 2 tablespoons margarine, 2 drops red food coloring and 3 drops yellow, and 2 full cups of mini marshmallows just until melted.  Stir in cereal from the large bowl until combined.  Press into the bread pan on top of the white layer; set aside. Wash the small sauce pan. 
In the small saucepan combine 2 tablespoons margarine, 5 drops yellow food coloring and 2 full cups of mini marshmallows just until melted. Stir in the remaining cereal until combined.  Press into the bread pan on top of the orange layer.  The mixture will not all fit in the bread pan. 
Place the small piece of wax paper on top of the krispie treat, greased side down. Flip the entire treat upside down to help form the top layer and place back into the pan to allow it to set for 1-2 hours or overnight.  Un-wrap the krispie treat.  On a cutting board slice the treat into three long sections. Take each of the three segments and slice into triangles.

Friday, October 29, 2010

Spooky Meatloaf


Make recipe for Meatloaf,

Press into shaped pan or mold using your art skills.

(I used the Wilton skeleton ice mold. If using an intricate and hand wash only pan, start by lining it with plastic wrap, then press the meat in firmly.  Once molded, remove meat, place on baking sheet, and of course, remove the plastic wrap. )

Make the sauce and set aside for garnish.

Bake meatloaf according to directions. Remove from oven and layer with slices of your favorite white cheese to resemble bandages. Place in the oven to soften the cheeses. I left this one in too long, and the bandages turned to an oozey goo. Still spooky!

Remove once cheese is melted and garnish with olives or cherry tomatoes for eyes.  Serve with Meatloaf Sauce on the side.

Here is a link to Family fun and their version, which has properly melted cheese!

Monday, October 25, 2010

Slimey Bog Punch

I concocted this recipe using things I had in my pantry.

Dissolve 6 oz lime gelatin in 1 quart boiling water

Mix 5 cups cold water and 3 scoops (or 3/4 cup) orange drink mix (Tang)

Combine and add 4-6 liters of citrus or lemon lime soda. (Chill soda or serve over ice)

Friday, October 22, 2010

Black Lagoon Punch

This one came from AllRecipes it comes out brownish, but will look darker in a colored serving bowl. This one is particularly effective for showing off ice molds.

1 (.13 ounce) envelope unsweetened grape soft drink mix
1 (.13 ounce) envelope unsweetened orange soft drink mix
2 cups white sugar
3 quarts cold water
1 liter ginger ale

Saturday, October 10, 2009

Spooky Taco Salad

This gem is from Taste of Home


Friday, October 9, 2009

Bone bites


I found this fun idea on iVillage:
36 pretzel sticks and rods of various sizes
1 (12-ounce) package white chocolate chips (2 cups)
72 mini-marshmallows (about 1 cup)

Directions:

Makes 36 bones

More fun with pretzels and melted chocolate! Like the pretzel lollipop ghosts, these are a tasty mix of sweet and salty. With the white chocolate coating on them, they are uniformly charming. For the best effect, heap and jumble the little bones in a bowl rather than laying them on a plate. (Although I call for white chips, this is one place where lower grade white "coating" chocolate or bark is so easy to work with that it might be worth the trade-off in taste.)

1. Line a rimmed baking sheet with parchment or wax paper.

2. Place the chips in a double boiler over just-simmering water and melt, stirring frequently. As soon as the chips are just melted (there may even be a few solid ones left), remove the pan from the heat and remove the top section of the double boiler so the chocolate's temperature doesn't keep rising.

3. Stick marshmallows onto both ends of the pretzels, with the marshmallows' flat sides parallel to the pretzel.

4. Dip each pretzel in the chocolate and lift out with a fork, letting the excess drip back in the bowl. Lay the bones on the baking sheet and refrigerate for 30 minutes to harden the chocolate. Store in an airtight container in the refrigerator or at a cool room temperature.

Recipe courtesy of Ghoulish Goodies by Sharon Bowers Copyright © 2009; photo courtesy of Kevin Kennefick
Used by permission of Storey Publishing LLC
All Rights Reserved

Wednesday, October 7, 2009

Tuesday, September 29, 2009

Eyeball soda & Jello Worms

Check out this post on Dabbled.org for instructions on these creepy bubbles.


For an extra slimy treat, try these Jello Nightcrawlers! I get shivers just looking at them. Here is a second link on making them.

Thursday, September 3, 2009

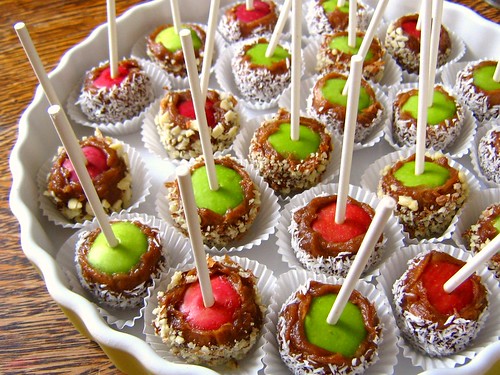
Caramel Apple Bites


Thanks to Family Fun and EHow.com for this great idea!

You will need:

  • Granny Smith apples -One apple makes around 6 bites
  • Cookie scoop or large melon baller
  • Wooden skewers or lollipop sticks
  • Caramel or melting chocolates
  • Toppings* such as chopped nuts, nonpareils, sprinkles, coconut, crushed candy bars or cookies, etc
  • Small paper candy cups
  1. Melt the caramel in a saucepan over medium heat.

  2. Wash off the apples.

  3. Cut into the apples with the cookie scoop or melon baller, making circular scoops to create little balls of apple. The peel should serve as a flat base to rest the ball. (But I like the look of them at the top, so you can tell it is an apple) You can get about four to six balls out of one apple.

  4. Pat the apples to remove any excess juices from the fleshy part of the ball.

  5. Insert the wooden skewers or lollipop sticks into the center of the top of the apple ball. If you're using skewers, don't allow the tips to pierce the skin on the bottom of the apple, or the apple will slide down when it's picked up.

  6. Give the apples another pat to dry off any juices that may have run out while inserting the sticks. Dip in powdered sugar, then tap off the excess.

  7. Dip the apple balls into the caramel, twisting to make sure you cover the whole thing.

  8. Set dipped apple on paper candy cup. Then place on a dish or tray, and place in the refrigerator for about half an hour. This will allow the caramel to set.

  9. Serve immediately. If you are unable to serve the apples right away, make sure to leave them in the refrigerator until you are ready for them. Unlike on a regular caramel apple, the flesh is exposed and so the apple will spoil much faster. Serving them immediately will make sure they are still crisp

*Check out these sites for gourmet topping ideas
Rocky Mountain Chocolate Factory
Amy' s Decadent Chocolates

Miss Debbie's Specialty Apples

Thursday, October 30, 2008

Goblin Toes


These creepy digits entertain my scouts every year!

You will need:
A jar of baby dill pickles
Sliced almonds
a paring knife

Lay out pickles on a plate or cutting board. Determine which side lays most stable, and pick an end for the nail. (I like the thicker end) Use your paring knife to slice the tip off the pickle to create a nail bed. I make an L shape cut, so there is a straight end where the bed meets the rest of the "toe."

Select an almond that fits the nailbed you have created, and simply place it on. The nails do slip loose, so if you are travelling with these, either pack them tight in a container or put the nails on right before serving.

Wednesday, October 29, 2008

Yummy Mummies


So these yummy things pop up every year at Halloween parties and family events. Here is our version.

Take your favorite type of hotdog -Turkey dogs are yummy, what can I say?
Pop out a can of Pillsbury dough. This time we tried the recipe creations, the dough is one big piece. Lay it out (on sprayed cookie sheet) use pizza cutter to cut into long strips. I found the ones about 1 inch thick were easiest to work with.

I warmed one package of hotdogs in the microwave. I like to think that gives them a headstart to heat all the way through. Move cut strips to the side. One by one, wrap each hotdog with one long strip of dough, leaving a space for the Mummy's face to show. Bake as directed, about 13 minutes at 375. Remove from oven when golden brown. Use mustard and a toothpick to dab eyes on each mummy. Don't worry if you don't like mustard, the portion is so small, you won't taste it. We tried making eyes with ketchup and BBQ sauce, they match the hotdog too much. Once they cool a bit, munch away and enjoy your yummy mummies!

Spooky kooky cakes


Mark and I teamed up our creativity to make these. Make a regular batch of cupcakes, and a batch of green frosting. (Recipe to come at a later date.) Prepare frosting and monster parts. We used:
Gummy eyeball candy
airheads- cut and molded to desired shapes
white chocolate chips
black gel icing
marshmallows (large ones cut in half)

Ice cupcakes with a star or grass tip. Use candies to add eyes, tongues, eyebrows, and whatnot. Have fun!

Ghost puddle potatoes

For the basic recipe you will need 1 batch warm mashed potatoes and one can of black beans, rinsed.


Make sure your potatoes are creamy. Fill a gallon or quart size freezer bag with potatoes. Use scissors to snip of one corner of the bag. Use this like an icing bag, squeezing from the zip end towards the open corner, rolling up the slack in the bag as you go. It works well to hold the bag vertical to the plate, squeezing consistently, and bobbing the bag up and down to make the puddled effect. Once you have a plateful of ghastly puddles, insert two black beans in for eyes, and one for a mouth if so desired. Viola!

Stuffed Puddle Ghosts:
Same as above, but mix in sour cream, garlic salt, mozarella, and precooked bacon bits. We used bacon bits for eyes. Tasty fine!

Tuesday, October 28, 2008

Breadstick bones

Begin with bread dough, homemade, frozen dough, from a can, whatever. I used a frozen loaf, thawed, of course. Flour your surface, and lightly flour both sides of the dough. Roll it out into a long rectangle. Use a pizza cutter to cut into strips the short way, so you have around 20 short sticks from the dough. Stretch each breadstick to about 10 inches, dip in melted butter, and tie each end in a knot. Arrange on lightly sprayed pan, taking care not to twist the center of the bone. Allow dough to rise, then sprinkle with parmesan. Bake at 350 until lightly golden brown.

Sunday, September 21, 2008

Spiced Pumpkin Seeds


1 ½ Tablespoons margarine, melted
½ teaspoon salt
1/8 teaspoon garlic salt
2 teaspoons Worcestershire sauce
2 cups raw whole pumpkin seeds

Collect seeds and rinse well. Dry with a paper towel. Preheat oven to 275 degrees. Combine all ingredients, mix thoroughly, and place in shallow baking dish. Bake for one hour, stirring occasionally.